Transform everyday items into calming DIY projects with these stress-melting repurposing crafts. You'll create enchanting Mason jar fairy lights for a cozy ambiance, paint-dipped wine bottles for artistic color therapy, and charming teacup succulent gardens that require minimal care. Turn meaningful fabric scraps into memory quilts, craft delicate paper flowers from old book pages, build rustic wall art from wooden pallets, or design melodic wind chimes from glass bottles. These mindful projects don't just declutter your space – they'll help you slow down, breathe, and discover the therapeutic power of giving discarded items new life and purpose.
Mason Jar Fairy Lights
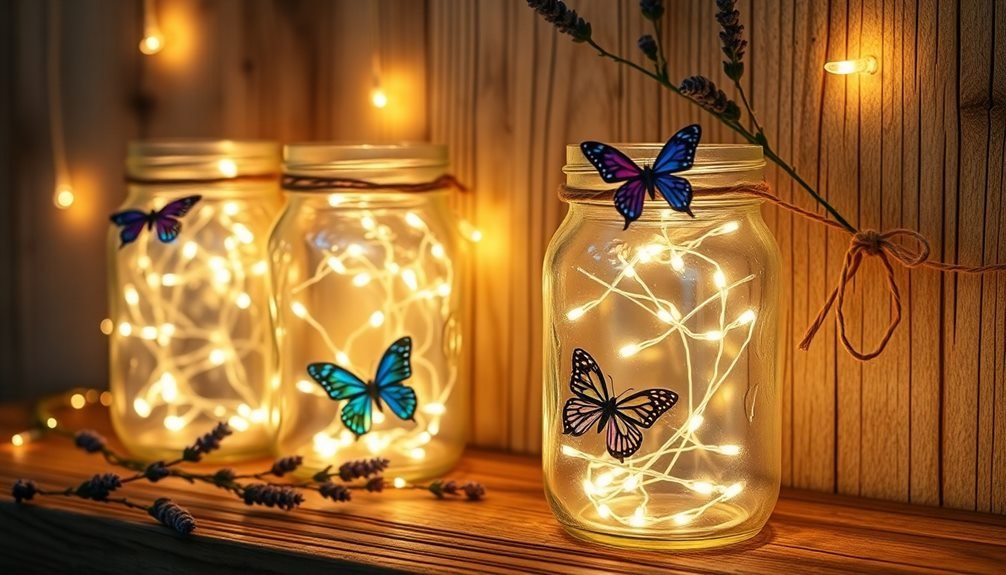
Transform ordinary mason jars into enchanting luminaries with delicate fairy lights – a perfect craft to calm your mind after a long day. This simple yet meditative project requires minimal supplies: clean mason jars, battery-operated fairy lights, and optional decorative elements like ribbons, twine, or frosted glass spray.
Start by thoroughly cleaning your jar, removing any labels and sticky residue. If you'd like a frosted effect, spray the exterior with frosted glass paint, allowing each layer to dry completely. The repetitive motion of applying even coats can help quiet racing thoughts.
Next, carefully arrange the fairy lights inside the jar, ensuring the battery pack sits discreetly at the bottom or hangs over the rim. For added personalization, wrap twine or ribbon around the jar's neck, or create patterns using paint markers. You can also add seasonal elements like artificial snow in winter or dried flowers in spring.
Place your completed luminaries on windowsills, bedside tables, or outdoor spaces where they'll cast a gentle, calming glow. The soft light creates a peaceful ambiance that helps reduce anxiety and promotes relaxation, making this craft both creative and therapeutic.
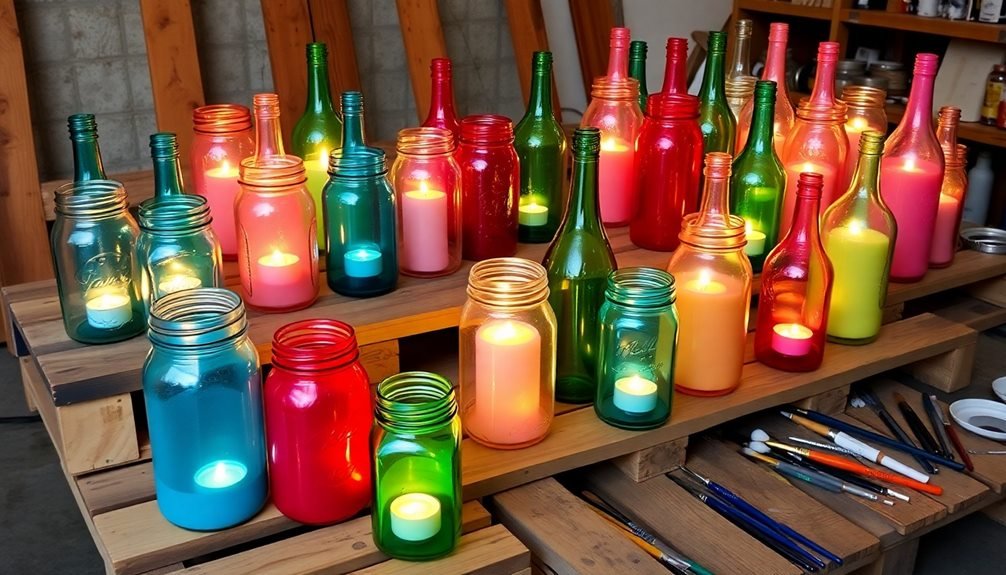
Paint-Dipped Wine Bottles
Along with being eco-friendly, turning empty wine bottles into paint-dipped decor pieces offers a satisfying way to reduce stress through color therapy. You'll need clean wine bottles, acrylic paint, painter's tape, and a workspace covered with newspaper. Start by removing labels and adhesive residue using warm, soapy water and rubbing alcohol.
| Paint Color | Mood Effect | Best Room Placement |
|---|---|---|
| Soft Blue | Calming | Bedroom or Bath |
| Mint Green | Invigorating | Kitchen or Sunroom |
| Blush Pink | Nurturing | Living Room |
| White | Clarity | Office or Study |
| Gold | Confidence | Dining Room |
To create your paint-dipped effect, tape off the section you want painted, ensuring a straight line. Dip or brush paint onto the bottom third of the bottle, applying 2-3 coats for ideal coverage. You can experiment with different heights and angles for variety. Once dry, remove the tape carefully for crisp lines. These bottles work beautifully as standalone pieces or as vases for dried flowers. Group them in odd numbers for maximum visual impact, and consider matching your color choices to your existing room decor for a cohesive look.
Tea Cup Succulent Gardens
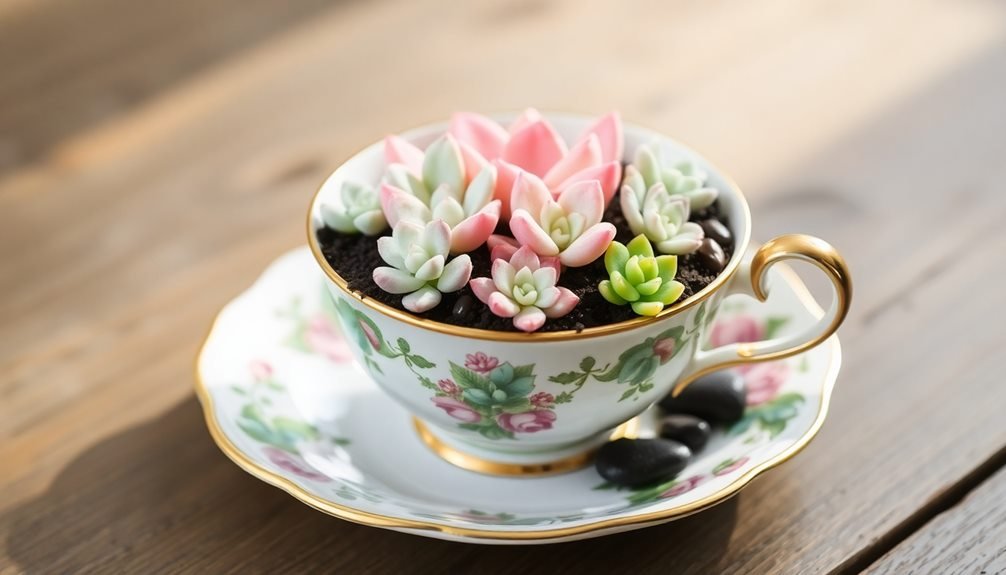
Inside vintage teacups, miniature succulent gardens offer a delightful way to practice mindful gardening while creating charming decor.
You'll find these compact gardens perfect for windowsills, desks, or as unique gifts that combine both form and function. The process of creating them can be deeply therapeutic, allowing you to focus on the present moment while working with your hands.
Start by selecting teacups with drainage holes or carefully drill them yourself. Layer the bottom with small pebbles for drainage, then add cactus potting mix.
Choose small succulents that'll fit proportionally in your teacup – consider echeveria, haworthia, or jade plants. You can mix different varieties for visual interest, but don't overcrowd them.
When planting, gently loosen the roots and position your succulents, leaving space between each plant. Top the soil with decorative stones or colored sand to complete the look.
These tiny gardens need minimal care – just place them in bright, indirect light and water sparingly when the soil feels dry. You'll find that tending to these miniature landscapes can become a peaceful ritual that helps you decompress after a long day.
Fabric Scrap Memory Quilting
Memory-rich fabric scraps from old clothes, blankets, and meaningful textiles can find new life through the art of quilting. You'll discover that transforming cherished clothing pieces into a cozy quilt creates both a functional item and a tangible connection to precious memories. Start by collecting fabric from baby clothes, wedding dresses, inherited linens, or your favorite worn-out shirts.
To begin your memory quilt, cut your fabric scraps into uniform squares or shapes that'll work with your chosen pattern. You don't need advanced sewing skills – simple straight-line quilting works perfectly for beginners. Layer your pieces on a flat surface, arrange them in a pleasing pattern, and pin them together before sewing.
Consider adding labels or embroidered dates beneath specific squares to document their significance. As you sew each piece, you're not just crafting a blanket; you're weaving together stories and moments. The repetitive nature of quilting naturally calms your mind, while handling familiar fabrics triggers positive memories.
Your finished quilt becomes a tactile family heirloom that wraps you in comfort while preserving meaningful moments in every stitch.
Book Page Paper Flowers
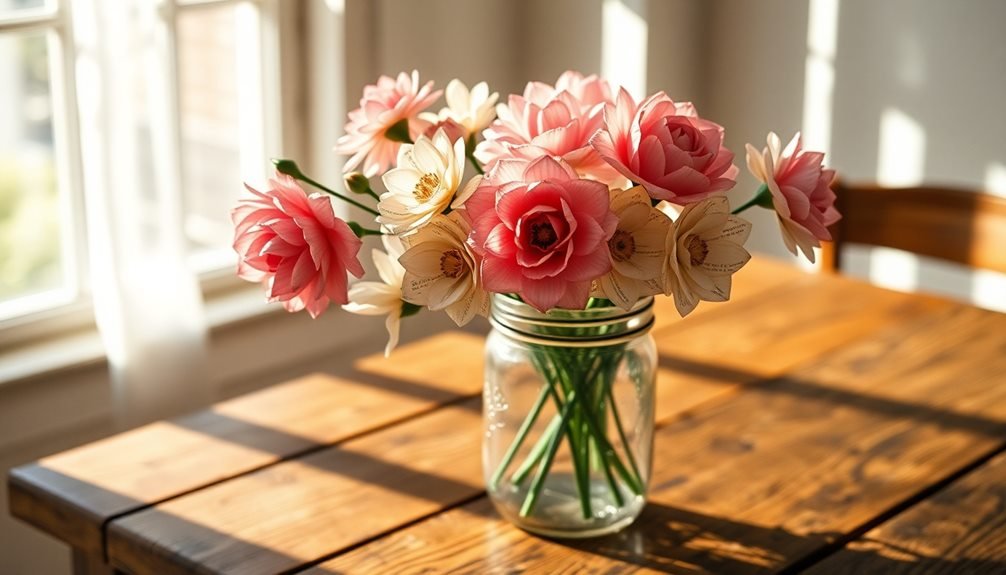
Transform old book pages into elegant paper flowers with materials you'll already have at home – scissors, glue, wire stems, and those forgotten paperbacks gathering dust on your shelves.
You'll find the step-by-step process surprisingly straightforward, starting with cutting petals, shaping them with gentle curves, and assembling your blooms from the center outward.
Once you've created your paper bouquet, you can arrange them in vintage vases, weave them into wreaths, or string them together for a literary garland that adds charm to any room.
Simple Step-by-Step Guide
Creating delicate paper flowers from old book pages offers a soothing way to unwind while giving forgotten texts new life. With just a few basic supplies – scissors, glue, and an old book you're willing to repurpose – you'll transform simple pages into intricate blooms.
Start by removing 5-6 pages from your book and cut them into circles of decreasing sizes, ranging from 3 inches to 1 inch in diameter. Layer these circles from largest to smallest, offsetting them slightly to create petal definition.
Using your fingers, gently crumple each layer toward the center, then release to create texture. Once you've achieved the desired effect, secure the layers with a small dot of glue in the center.
For a more natural look, roll the edges of each petal slightly outward using a pencil. You can also add dimension by lightly brushing the edges with brown ink or coffee stain.
Create leaves by cutting tear-drop shapes from additional pages and folding them lengthwise for added texture. Attach your completed flowers to stems made from wire or wooden skewers, and display them in a vintage vase for a charming upcycled centerpiece.
Supplies You'll Need
For making book page paper flowers, you'll need just a handful of basic supplies that are easy to find at home or in craft stores. The essential materials include old books you don't mind repurposing, sharp scissors, a hot glue gun with glue sticks, and a pencil for rolling petals.
You'll also need a sturdy cardboard base to attach your flowers.
Optional supplies can enhance your creation's appearance. Consider adding green floral wire or wooden dowels for stems, green floral tape to wrap the stems, and pearl beads or buttons for flower centers.
If you want to age your paper flowers, you'll need coffee grounds or tea bags for staining, plus a shallow dish for the dying process.
For more elaborate designs, include additional items like craft paint, glitter, or metallic spray paint to add shimmer.
Don't forget protective materials like newspaper to cover your work surface and disposable gloves if you're planning to stain or paint the paper.
A ruler can help you measure and cut uniform petal sizes, while wire cutters become necessary if you're using floral wire for stems.
Creative Display Ideas
With endless possibilities for showcasing your book page paper flowers, you'll find creative ways to bring literary charm into any room.
Mount them on canvas boards to create dimensional wall art, or arrange them in vintage teacups for whimsical centerpieces. You can even string them together to form a romantic garland perfect for mantels or doorways.
Transform clear glass vases by filling them with your paper blooms, creating stunning focal points for bookshelves or side tables. For a unique twist, attach your flowers to branches in a tall floor vase, letting them cascade naturally.
Don't forget window displays – suspend individual blooms at varying heights using clear fishing line for an enchanting effect.
Consider creating a paper flower wreath for your front door or study, mixing different sizes and page tones for added depth. You can also tuck single blooms into picture frames, weave them through existing artificial greenery, or use them to dress up gift packages.
For a portable display, arrange them in shadow boxes that you can easily move and reposition. If you're feeling ambitious, create a full paper flower wall installation for a show-stopping backdrop in your home office or reading nook.
Wooden Pallet Wall Art
Designed to add rustic charm to any room, wooden pallet wall art transforms discarded shipping materials into stunning home decor. You'll need to start by carefully dismantling a wooden pallet, removing nails, and sanding rough edges to create safe, workable pieces.
Begin your project by sketching your design on paper, considering shapes like geometric patterns, landscapes, or inspirational phrases. You can either keep the natural wood appearance or paint the pieces in your chosen colors. For added dimension, try whitewashing or staining different boards to create contrast.
To assemble your artwork, you'll want to arrange the wooden pieces on a flat surface before securing them. Use wood glue and finishing nails to connect the pieces, ensuring they're firmly attached.
Consider adding metal accents, rope details, or LED lights to enhance your design.
Don't forget to seal your finished piece with polyurethane to protect the wood and maintain its appearance. Install sturdy D-rings or mounting brackets on the back for secure wall hanging.
Your custom pallet art won't just serve as a conversation piece – it'll also provide a sense of accomplishment and creative satisfaction while reducing waste.
Glass Bottle Wind Chimes
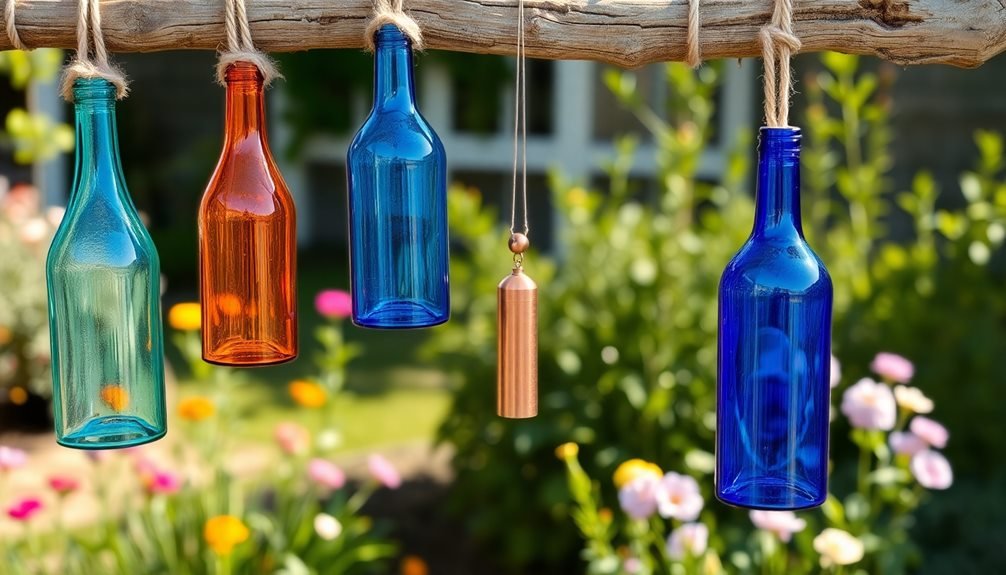
Transform your glass bottle wind chimes into a vibrant masterpiece by choosing colors that match your outdoor space, whether you're using paint, stained glass techniques, or a mix of naturally tinted bottles.
You'll want to hang your creation where it can catch both sunlight and gentle breezes, typically 4-6 feet off the ground with sturdy fishing line or decorative chain.
For the most enchanting sound, try arranging bottles of different sizes in a circular pattern, keeping larger bottles toward the center and smaller ones around the edges.
Personalize Your Color Palette
Selecting colors that resonate with your personality can turn ordinary glass bottle wind chimes into powerful stress-relief tools. You'll find that certain hues evoke specific emotional responses, making your craft project more meaningful and calming. Consider using glass stains, translucent paints, or even food coloring mixed with glass sealant to achieve your desired palette.
| Color Choice | Emotional Effect |
|---|---|
| Blue | Promotes tranquility and reduces anxiety |
| Green | Encourages balance and natural harmony |
| Purple | Stimulates creativity and spiritual awareness |
| Yellow | Boosts mood and increases optimism |
When painting your bottles, work in a well-ventilated area and apply thin, even coats for the best transparency. You'll want to let each layer dry completely before adding another. Don't forget to experiment with color combinations – try creating gradients or patterns that speak to you. If you're feeling adventurous, mix metallic paints with your chosen colors to add sparkle when sunlight hits your chimes.
Remember that darker shades will create deeper, more dramatic shadows while lighter tones will give your wind chimes an airy, ethereal quality. Test your color combinations by holding bottles up to natural light before committing to your final design.
Hanging Tips and Tricks
Once you've created your beautifully colored bottles, proper hanging technique makes all the difference between a harmonious symphony and a chaotic clatter. To achieve the perfect balance, you'll need to take into account spacing, height variation, and wind exposure when assembling your wind chime masterpiece.
Start by selecting a sturdy main support piece, like a weatherproof wooden disc or metal ring, that's at least 12 inches in diameter. You'll want to drill evenly spaced holes around the perimeter for consistent bottle placement. Consider using fishing line or thin, weather-resistant cord that won't detract from your bottles' beauty.
- Space bottles at least 3 inches apart to prevent unwanted clinking and potential breakage.
- Vary hanging lengths between 4 and 12 inches to create visual interest and different sound frequencies.
- Position heavier bottles toward the center and lighter ones around the edges for better stability.
Don't forget to test your creation in different wind conditions before finalizing the hanging lengths. If you notice any bottles hitting each other, adjust their positions or add small wooden beads between them as natural spacers.
Frequently Asked Questions
How Long Does It Typically Take to Complete Each Repurposing Craft Project?
You'll find most repurposing craft projects take between 30 minutes to 3 hours to complete, depending on your skill level and the project's complexity. Simple transformations go quickly, while detailed makeovers need more time.
What Safety Precautions Should Be Taken When Working With Recycled Materials?
When working with recycled materials, you'll need protective gloves, a dust mask, and eye protection. Always clean items thoroughly, watch for sharp edges, and guarantee proper ventilation when using adhesives or paints.
Can Children Participate in These Craft Activities?
Yes, you'll find many kid-friendly recycling crafts, but always supervise them, especially with sharp tools or small items. Choose age-appropriate projects and guarantee they've washed their hands after handling recycled materials.
Where Can I Find Bulk Materials for These Projects?
You'll find bulk materials at thrift stores, yard sales, online marketplaces, and recycling centers. Don't forget to check local buy-nothing groups, Facebook Marketplace, and your community's freecycle networks for free supplies.
Do I Need Special Tools or Equipment for These Repurposing Crafts?
You'll need basic household tools like scissors, glue, and paintbrushes for most repurposing projects. Don't worry about special equipment – a craft knife, measuring tape, and pliers will handle most DIY crafts.
In Summary
You'll find endless possibilities to transform everyday items into beautiful crafts while melting stress away. Whether you're creating enchanting mason jar lights or quilting cherished memories, these projects help you unplug and focus on the present moment. Don't forget to gather supplies from around your home – you'd be surprised what treasures await repurposing. Start small, experiment freely, and watch your creativity bloom alongside your peace of mind.


Leave a Reply