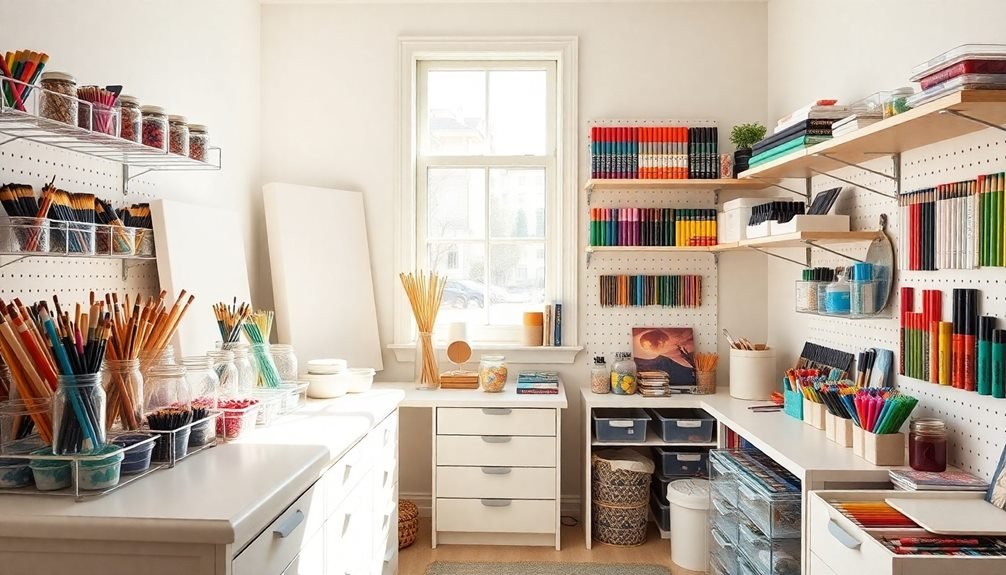
To organize your art supplies effectively, start by evaluating your studio space and sorting materials by frequency of use. Keep daily essentials within arm's reach while storing occasional items in labeled containers on higher shelves. Maximize vertical space with pegboards, magnetic strips, and floating shelves for tools and materials. Implement a color-coding system to quickly identify supply categories, and use clear storage solutions for better visibility. Consider adding mobile supply carts for flexibility between workstations, and maintain a systematic labeling approach for easy tracking. These foundational steps will set you up for a more detailed organization strategy.
Assess Your Current Studio Space

Analyzing your studio's current layout is the essential first step in organizing your art supplies.
Take a thorough inventory of your workspace, noting the available square footage, natural light sources, electrical outlets, and storage potential. Pay attention to underutilized vertical spaces, corners, and wall areas that could accommodate shelving or pegboards.
Examine how you currently use the space and identify problem areas where supplies tend to accumulate or become disorganized.
Consider your creative workflow – notice which materials you use most frequently and which ones you rarely touch. Document any existing storage solutions that aren't working effectively, such as drawers that don't open fully or shelves that are too deep for easy access.
Measure your workspace dimensions carefully, including window sills, alcoves, and door clearances. These measurements will help you plan for new storage furniture or organizational systems.
Don't forget to assess your lighting needs and ventilation requirements, especially if you work with materials that require proper air circulation.
Make note of any electrical needs for task lighting or specialized equipment you'll need to accommodate in your reorganized space.
Sort By Frequency Of Use
A time-tested organization strategy involves arranging your art supplies based on how often you use them. Your most frequently used items should be within arm's reach of your primary workspace, while materials you rarely touch can be stored in less accessible areas.
- Daily essentials (pencils, brushes, favorite paints) – Keep on your desk or in easy-access drawers
- Weekly items (specialty tools, specific paint colors) – Store in nearby cabinets or shelves
- Monthly supplies (backup materials, seasonal items) – Place in labeled boxes on middle shelves
- Occasional materials (specialty papers, unique mediums) – Organize in clearly marked containers on higher shelves
- Rare-use items (seldom-used tools, archived supplies) – Store in basement, attic, or deep storage
Create three distinct zones in your studio: immediate access, secondary storage, and deep storage. Your immediate access zone should contain supplies you'll need for current projects.
Secondary storage can house materials you use every few weeks, while deep storage is perfect for supplies you might need only a few times a year. Remember to adjust these zones as your artistic focus changes and different supplies become more or less relevant to your work.
Create Color-Coded Storage Zones

Building on the frequency-based organization system, color-coding your storage zones adds another layer of efficiency to your art studio setup. You'll find items faster and maintain organization by assigning specific colors to different supply categories. Use colored bins, labels, or tape to designate zones for various materials.
| Zone Color | Supply Category | Location Example |
|---|---|---|
| Red | Paint Supplies | Upper Left Shelves |
| Blue | Drawing Tools | Middle Drawers |
| Green | Paper & Canvas | Vertical Storage |
Implement your color system consistently across all storage areas. Label shelves, drawers, and containers with matching colored stickers or tape. When you're working on a project, you'll instantly know that all red-coded items relate to painting supplies, while blue indicates drawing materials. This visual system helps you maintain organization even during intense creative sessions.
Consider using warm colors for wet media supplies and cool colors for dry materials. You can also create sub-categories within each color zone using different shades – for instance, light blue for graphite pencils and dark blue for colored pencils. Remember to create a color key chart and display it prominently in your workspace for quick reference.
Maximize Vertical Storage Solutions
Many artists overlook valuable wall space that could transform their storage capabilities.
You'll maximize your studio's potential by thinking vertically and implementing smart wall-mounted solutions. Installing pegboards, floating shelves, and magnetic strips can instantly multiply your storage options while keeping supplies within arm's reach.
Consider these vertical storage strategies to revolutionize your workspace:
- Mount adjustable pegboard systems with customizable hooks and bins for frequently used tools like brushes, scissors, and rulers.
- Install clear acrylic wall pockets to organize papers, canvases, and works in progress while keeping them visible.
- Attach magnetic knife strips to hold metal tools, creating an easily accessible display of scissors, rulers, and palette knives.
- Set up floating shelves at varying heights to store paint bottles, jars, and other supplies while creating visual interest.
- Use over-the-door organizers with clear pockets to store smaller items like markers, pencils, and craft supplies.
Remember to anchor all wall-mounted storage solutions properly and distribute weight evenly.
Position frequently used items at eye level and store heavier supplies on lower shelves for safety and convenience.
Design Your Ideal Workflow

Smart workflow design directly impacts your creative productivity and artistic output.
To create an efficient workspace, map out your most common art activities and arrange supplies based on frequency of use. Position your primary tools and materials within arm's reach of your main work area, while storing less-used items in secondary zones.
Create designated stations for specific tasks like sketching, painting, or digital work. Your painting station should keep brushes, paints, water containers, and palettes together, while your drawing area might combine pencils, erasers, and paper.
Don't forget to include a cleaning station with paper towels, soap, and brush cleaners.
Consider your natural movement patterns and arrange tools to minimize reaching or standing. Right-handed artists should position frequently used items to the right, and left-handed artists to the left.
Install adequate lighting at each workstation and guarantee proper ventilation for areas using solvents or sprays.
Maintain clear pathways between stations and keep your most-used supplies visible. Label storage containers and drawers to quickly locate materials, and regularly evaluate your workflow to identify and eliminate bottlenecks or inefficiencies.
Clear Countertop Systems
A clear countertop system lets you maximize your workspace while keeping essential supplies within reach. Create designated zones on your work surface using clear acrylic organizers, mason jars, and rotating caddies. Position frequently used items like brushes, pencils, and markers at arm's length, while keeping your primary work area open for active projects.
Consider these essential elements for an efficient countertop system:
- Install a pegboard backdrop above your counter to hang tools and free up valuable surface space.
- Use stackable clear containers with drawers for small items like erasers, clips, and sharpeners.
- Position a rolling cart beside your workspace for supplies that don't need constant access.
- Implement a "clean as you go" system by keeping a small trash bin within reach.
- Label all containers and zones to maintain organization long-term.
Maintain this system by doing a quick five-minute cleanup at the end of each creative session. Store bulkier supplies in cabinets or drawers below your workspace, and keep only daily essentials on the counter.
This approach guarantees you'll always have a clean slate ready for your next artistic endeavor while maintaining easy access to your tools.
Mobile Supply Carts

Building on the efficiency of a clear workspace, mobile supply carts offer unmatched flexibility for artists who need their materials close at hand. These versatile organizers let you roll your supplies exactly where you need them, whether you're working at an easel, desk, or outdoor space.
| Cart Feature | Benefits |
|---|---|
| Multiple Tiers | Separate supplies by type or frequency of use |
| Mesh Baskets | Visibility of contents and proper ventilation |
| Locking Wheels | Stability when stationary, mobility when needed |
| Side Hooks | Hanging tools and materials for quick access |
| Pull-out Drawers | Protected storage for delicate items |
When selecting your cart, consider the weight capacity and shelf spacing needed for your specific supplies. Metal carts typically offer more durability than plastic ones, while clear drawer units make supply identification easier. You'll want to organize your cart with frequently used items on the middle shelves at arm's level, heavier supplies on the bottom tier for stability, and delicate materials in protective drawers. Don't forget to label each section clearly and maintain an organized system as you use your supplies.
Label Everything Systematically
Start your labeling system by color-coding your major art supply categories, like red for paints, blue for drawing tools, and green for paper products.
You'll find it helpful to create a custom template system that uses consistent label sizes, fonts, and placement locations across all your storage containers and drawers.
Once you've established these organizational standards, you can quickly identify and access your supplies while maintaining a visually cohesive storage solution.
Color-Coding Your Categories
Through effective color-coding, you'll transform your art supplies into an easily navigable system that saves time and reduces frustration. Assign specific colors to different categories of supplies, making them instantly recognizable even from across your studio. For example, use red for painting supplies, blue for drawing materials, and green for paper products.
Consider these color-coding strategies for your art supplies:
- Use colored tape or stickers on storage containers to identify contents at a glance.
- Apply matching colored dots to both the storage bin and individual items inside.
- Create a color key chart and display it prominently in your workspace.
- Select storage containers in corresponding colors for each supply category.
- Paint drawer handles or shelf edges to match your color-coding system.
Remember to maintain consistency throughout your studio. If you've designated yellow for sculpting tools, stick to that choice across all related items and storage solutions.
You can also extend this system to your digital organization, using the same colors for folders and files on your computer. This visual organization method works particularly well for visual thinkers and can greatly improve your workflow efficiency.
Custom Template System
While color-coding provides visual organization, a robust labeling system takes your art supply management to the next level. Create a custom template that includes essential information for each item: product name, brand, type, color/shade, date purchased, and storage location.
You'll want to standardize your format across all labels to guarantee consistency and quick identification. Start by designing your template in a word processor or label-making software. Include a clear hierarchy of information, with the most vital details in larger text.
For art supplies that come in sets, add inventory numbers to track individual pieces. Don't forget to leave space for additional notes like replacement dates for perishable items or specific mixing ratios for mediums.
Apply your labels using weatherproof materials that resist smudging and water damage. Position them where they're easily visible without having to move containers. For drawers and boxes, place labels on both the front and top surfaces.
Update your system quarterly, removing labels from discarded items and adding new ones as you expand your collection. Consider creating a digital backup of your labeling system for quick reference and easy reprinting.
Frequently Asked Questions
How Do I Protect Expensive Art Supplies From Temperature and Humidity Damage?
Store your expensive art supplies in airtight containers with silica gel packets. Keep them in a climate-controlled room away from direct sunlight, maintaining temperatures between 65-75°F and humidity levels around 45-55%.
What's the Best Way to Dispose of Dried-Out Markers and Paints?
You'll need to check your local recycling guidelines for markers. Empty paint containers can go in recycling, but first let dried paint fully harden. Don't pour liquid paint down drains—contact waste management for disposal.
How Often Should I Clean and Maintain My Art Supply Storage Containers?
You'll want to clean your art supply containers every 3-4 months. Wipe them down monthly to prevent dust buildup, and immediately clean any spills or stains to keep your supplies organized and well-maintained.
Which Art Supplies Should Never Be Stored Together to Prevent Contamination?
Don't store solvents near papers or fabrics, keep wet and dry media separate, and keep pastels away from charcoal. You'll also want to isolate strong-smelling materials like markers to prevent odor transfer.
How Can I Prevent Paint Tubes and Markers From Drying Out?
Store your paint tubes and markers upright with caps tightly sealed. You'll want to keep them in a cool, dark place and wipe the openings clean after each use to prevent clogging.
In Summary
Your organized art studio is within reach! Now that you've sorted supplies, maximized space, and created efficient systems, you'll spend less time searching and more time creating. Remember to maintain your new organization by returning items to their designated spots and periodically reassessing your setup. With these strategies in place, you're ready to let your creativity flow in a stress-free, inspiring workspace.


Leave a Reply