
To create your backyard astronomy haven, start by selecting a viewing spot away from artificial lights with clear sky views. You'll need essential equipment like a quality telescope (4-6 inch reflector or 3-4 inch refractor), multiple eyepieces, and a red flashlight to preserve night vision. Set up comfortable seating with adjustable reclining chairs and weatherproof storage for blankets and cushions. Install dim, downward-facing pathway lights, and establish a dedicated area for meditation under the stars. Don't forget to record your observations in an astronomy journal. This celestial journey offers endless opportunities to explore the wonders above.
Choosing Your Perfect Viewing Spot
From identifying constellations to tracking planets, your backyard astronomy success depends heavily on where you set up your viewing spot. Start by finding an area that's as far away as possible from direct artificial light sources like street lamps and porch lights.
You'll want to position yourself where nearby buildings or trees won't obstruct your view of the night sky, particularly in the directions you plan to observe most frequently.
Consider creating a dedicated platform or paved area that's perfectly level – this will guarantee your telescope remains stable and properly aligned. If you're working with a permanent setup, check that your chosen spot allows for a clear view of the celestial pole, which is vital for proper telescope alignment.
The ground should be firm and well-drained to prevent your equipment from sinking or becoming unstable during use.
Don't forget to factor in comfort and convenience. You'll need enough space to move around your equipment safely, and you might want to include room for a small table to hold your star charts and accessories.
If possible, choose a location that's easily accessible from your house while still maintaining the best viewing conditions.
Essential Stargazing Equipment
To begin exploring the night sky as a backyard astronomer, you'll need some basic but essential equipment. A quality entry-level telescope or pair of astronomy binoculars will serve as your primary viewing tool, while detailed star charts or modern smartphone apps can help you navigate the celestial sphere.
Whether you choose traditional printed materials or digital guides, these navigation aids will help you identify constellations, planets, and other celestial objects during your stargazing sessions.
Telescopes and Viewing Tools
Successful backyard astronomy begins with choosing the right equipment, starting with a quality telescope as your primary viewing tool. For beginners, a 4-6 inch reflector telescope or a 3-4 inch refractor offers an ideal balance of power and portability.
You'll want to guarantee your telescope includes a stable mount – either an equatorial or altazimuth design – to prevent frustrating vibrations during viewing.
Essential viewing accessories will enhance your stargazing experience. You'll need at least three eyepieces: a low-power one for wide-field viewing, a medium-power for general observation, and a high-power eyepiece for detailed lunar and planetary viewing.
Don't forget to add a Barlow lens, which effectively doubles your eyepiece collection by increasing each one's magnification.
A red flashlight preserves your night vision while you're referencing star charts or adjusting equipment.
Consider adding a moon filter to reduce glare when observing our bright satellite, and a star diagonal for comfortable viewing of objects high in the sky.
If you're planning to view planets, you'll benefit from color filters that enhance specific planetary features and contrast.
Star Charts and Apps
Beyond telescopes and viewing tools, modern stargazers need reliable navigation aids to locate celestial objects in the night sky. You'll want to equip yourself with both traditional star charts and digital solutions to enhance your stargazing experience.
Physical star charts serve as reliable backups when technology fails, while mobile apps offer real-time information and interactive features. Consider investing in a red-light readable planisphere for quick constellation identification, and download at least two astronomy apps to cross-reference celestial objects.
| Tool Type | Benefits |
|---|---|
| Star Charts | Won't drain batteries, work in all conditions, teach fundamental navigation |
| Mobile Apps | Provide real-time updates, offer augmented reality features, track satellites |
| Planisphere | Shows visible constellations for any date and time, requires no power, portable |
Remember to download your apps' offline maps for areas without cellular coverage. Popular apps like Stellarium and Sky Map offer free versions with essential features, while SkySafari and Star Walk 2 provide premium features for serious observers. You'll find that combining both digital and analog tools creates the most thorough navigation system for your backyard astronomy activities.
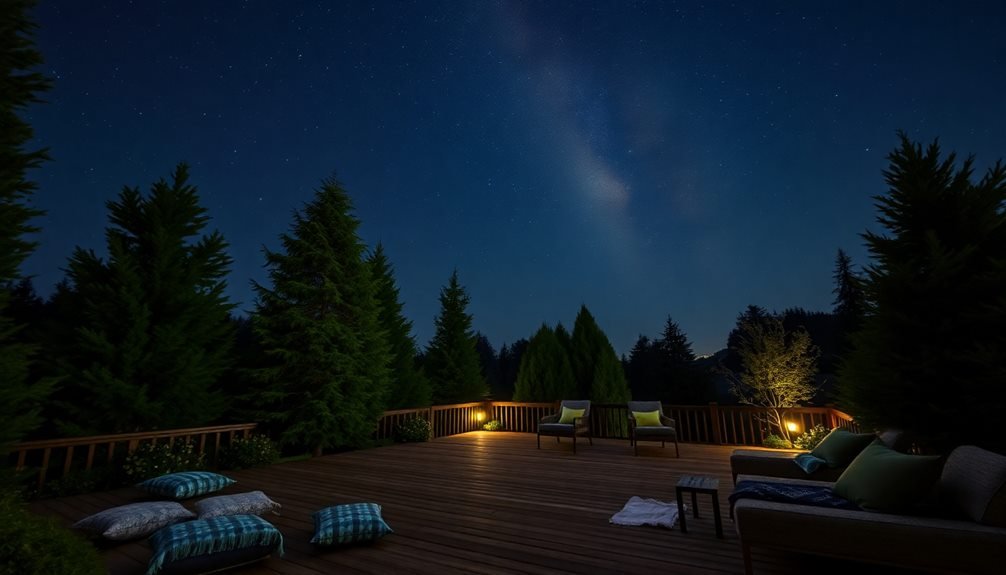
Creating Comfortable Seating Areas
You'll want to start with proper seating arrangements by selecting adjustable reclining chairs or loungers that let you comfortably view different areas of the night sky.
Keep your stargazing gear cozy and accessible with weatherproof storage boxes that house blankets, cushions, and other comfort items near your observation spot.
Consider versatile seating options like folding zero-gravity chairs or convertible benches that can serve multiple purposes in your yard when you're not stargazing.
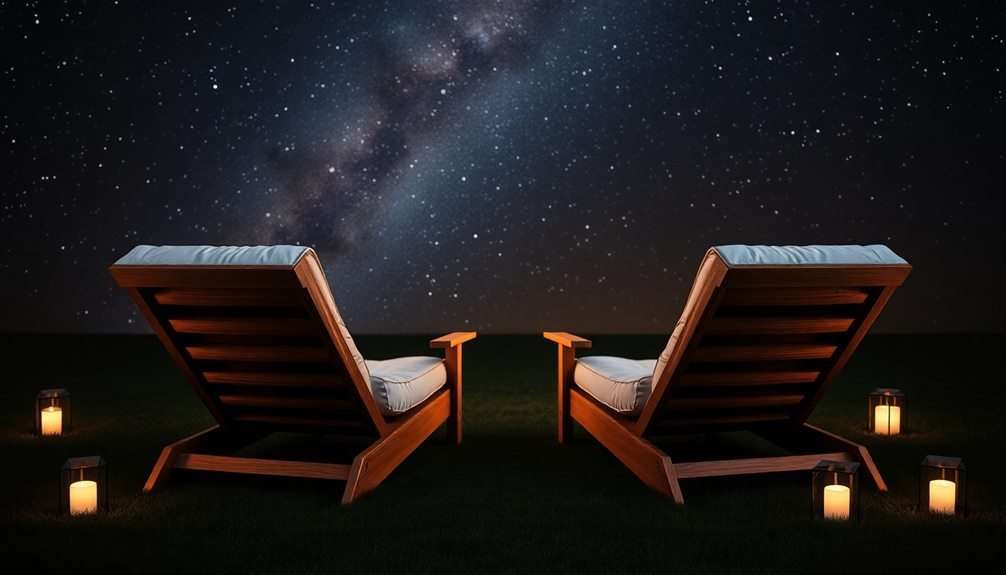
Reclining Chairs and Loungers
Comfortable seating is crucial for prolonged stargazing sessions, making reclining chairs and loungers a significant investment for your backyard astronomy setup. You'll want to select chairs that offer full-back support and multiple reclining positions to prevent neck strain during extended observation periods.
| Feature | Benefits | Considerations |
|---|---|---|
| Zero Gravity | Ideal spine alignment | Weather resistance |
| Adjustable Headrest | Neck support flexibility | Storage capability |
| Quick-dry Material | All-weather durability | Weight capacity |
| Padded Armrests | Extended comfort | Portability |
| Drink Holder | Convenience | Price point |
When choosing your stargazing chair, prioritize models with weather-resistant materials and easy storage options. You'll find that zero-gravity recliners are particularly effective, as they distribute your weight evenly and allow you to maintain a comfortable viewing position for hours. Consider chairs with built-in cup holders and side tables to keep your astronomy tools within reach. If you're planning group viewing sessions, invest in multiple lightweight, foldable options that you can easily store when not in use. Remember to test the reclining mechanisms before purchase to guarantee smooth operation in darker conditions.
Blankets and Cushion Storage
Storing your stargazing blankets and cushions properly guarantees they remain dry, clean, and readily accessible for impromptu observation sessions.
Consider investing in a weatherproof deck box or storage bench that doubles as additional seating when closed. Place it near your observation area to keep comfort items within arm's reach while protecting them from dew and rainfall.
Choose storage solutions with good ventilation to prevent mildew growth on your blankets and cushions. You'll want to include a few moisture-absorbing silica gel packets inside your storage container, especially if you live in a humid climate.
If you're using a metal container, line the bottom with cedar planks to repel insects and absorb excess moisture.
Sort your items by season, keeping thermal blankets and heated cushions separate from lightweight summer throws.
You'll also want to store cleaning supplies nearby – a lint roller and fabric freshener can quickly prep your items for unexpected guests.
For cushions that don't fit in your main storage, consider using vacuum storage bags to compress them when not in use, keeping them under your deck box or in your garage.
Multipurpose Seating Solutions
When designing your backyard astronomy space, flexible seating arrangements become essential for both casual stargazing and serious observation sessions.
You'll want to incorporate versatile options that can adapt to different viewing positions and group sizes while maintaining comfort throughout your astronomical adventures.
Consider these practical multipurpose seating solutions for your stargazing sanctuary:
- Zero-gravity recliners that fold flat for storage but adjust to multiple positions, perfect for both relaxed constellation viewing and precise telescope operation.
- Weather-resistant bean bags with removable, washable covers that provide casual seating for impromptu viewing sessions and double as daytime reading spots.
- Convertible bench-to-table combinations that serve as equipment stands during solo observations and transform into group seating for star parties.
- Adjustable-height astronomy chairs with swivel capabilities, allowing smooth shifts between different viewing angles without straining your neck.
Remember to position your seating options at varying heights and angles to accommodate different viewing positions.
You'll also want to verify each piece can be easily moved to follow celestial objects across the night sky or quickly stored when weather conditions change.
Dark Sky Lighting Solutions
Dim, downward-facing lights transform your backyard into an ideal stargazing spot while maintaining safety and visibility.
Install motion-sensor path lights that emit soft red or amber illumination, as these wavelengths preserve your night vision while preventing trips and falls. Position these fixtures no more than 18 inches above the ground to minimize light pollution.
Replace bright porch lights with fully shielded fixtures that direct light downward at a 45-degree angle.
You'll want to install dimmer switches on all outdoor lighting to adjust brightness levels based on your needs. Consider using timers to automatically reduce lighting during prime observation hours.
For deck areas, install recessed step lights or low-voltage LED strips under railings. These provide sufficient illumination without creating glare or washing out the night sky.
Add weatherproof red LED tape beneath bench seating or along pathways for subtle guidance markers.
Don't forget to address light trespass from neighboring properties.
Plant strategic hedges or install privacy screens to block unwanted light. You can also work with neighbors to adjust their outdoor lighting, promoting a darker sky for everyone's benefit.
Weather Protection and Storage
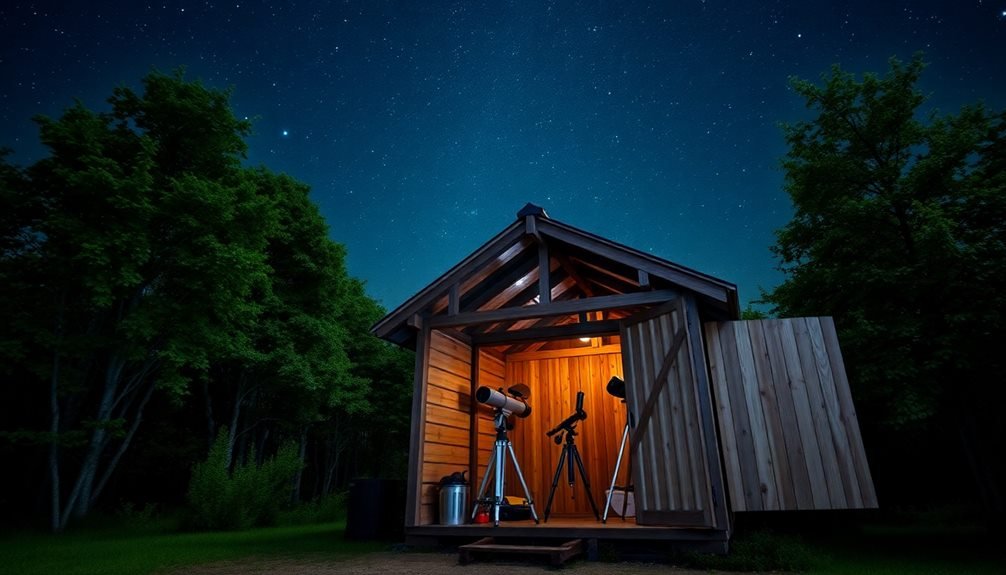
Protect your valuable astronomy equipment with a weatherproof storage solution that shields it from moisture, dust, and temperature fluctuations.
You'll need a dedicated space that's easily accessible yet secure, whether it's a small shed, weatherproof cabinet, or climate-controlled garage area. Consider installing dehumidifiers and temperature monitors to maintain ideal conditions for your telescopes and accessories.
- Mount heavy-duty storage hooks and brackets on sturdy walls to keep telescopes upright and prevent mechanical stress on delicate components.
- Use airtight, waterproof containers with silica gel packets for eyepieces, filters, and electronic equipment.
- Install rubber weatherstripping around storage unit doors and windows to prevent dust and moisture infiltration.
- Create a maintenance checklist area with cleaning supplies and tools readily available.
Don't forget to cover your observation area with a retractable awning or portable canopy for protection during unexpected weather changes.
If you're using a permanent telescope pier, invest in a robust protective dome or shield that you can quickly deploy.
Keep your power supplies and cables in waterproof boxes nearby, and always maintain a clear path between your storage and observation areas.
Meditation Corner Under Stars
Along with the technical aspects of astronomy, creating a dedicated meditation space beneath the night sky can transform your backyard into a sanctuary for mindful stargazing.
Select a flat, open area away from artificial lights and position comfortable seating that supports proper posture. A zero-gravity chair or padded meditation cushion on a weatherproof platform works well for extended viewing sessions.
Add soft, red LED lighting along pathways to preserve your night vision while safely maneuvering to your meditation spot.
You'll want to incorporate elements that enhance the sensory experience – consider installing a small water feature for gentle background sounds or hanging wind chimes that create subtle, calming tones. Place potted lavender or jasmine nearby for natural aromatherapy.
Design the space to accommodate both solo reflection and small group meditation sessions. Include a few portable ottomans or floor cushions that you can easily store when not in use.
Install a small, covered shelf to hold meditation tools like singing bowls, astronomy journals, or reference materials.
Remember to maintain clear sight lines to key celestial viewing areas while creating this contemplative corner that seamlessly blends astronomical observation with mindfulness practice.
Recording Your Celestial Observations
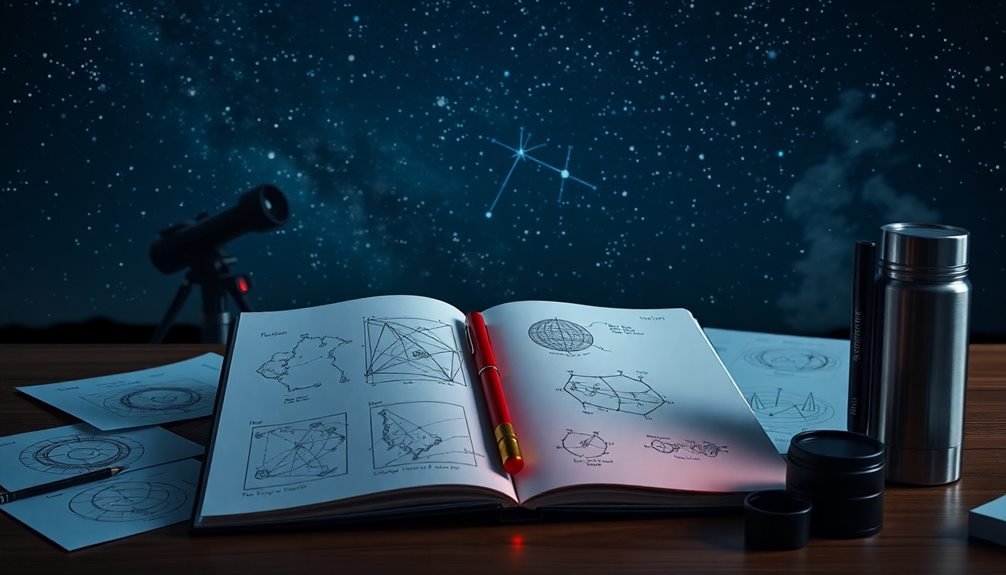
Recording your celestial observations serves three essential purposes: documenting your astronomical journey, building a detailed reference log, and contributing to citizen science projects.
You'll want to establish a systematic approach to logging your stargazing sessions, ensuring you capture valuable data that you can reference later.
- Keep a dedicated astronomy journal with weather conditions, date, time, location coordinates, and equipment used for each session.
- Use sketching templates to draw celestial objects, marking details like color variations, brightness, and visible features.
- Document your telescope's settings, including eyepiece combinations, filters used, and any tracking adjustments made.
- Take photos of your setup and observations, adding them to your digital log with detailed annotations.
Maintain both digital and physical records of your observations.
Apps like SkySafari and Stellarium can help you record specific object locations, while a waterproof notebook works best for field notes.
Don't forget to include personal insights and experiences – they'll help you track your progress and identify patterns in viewing conditions.
Consider joining online astronomy communities where you can share your logs and contribute to larger astronomical databases.
Seasonal Viewing Planning
Successful stargazing requires understanding how celestial objects change their positions throughout the year. You'll need to track seasonal constellations, moonrise times, and planetary visibility to make the most of your viewing sessions.
| Season | Best Viewing Objects | Ideal Hours |
|---|---|---|
| Winter | Orion, Taurus, Pleiades | 6 PM – 11 PM |
| Spring | Leo, Virgo, Bootes | 9 PM – 2 AM |
| Summer | Scorpius, Sagittarius, Milky Way core | 10 PM – 3 AM |
You'll want to plan your observations around these seasonal patterns. Winter offers crisp, clear skies with early darkness, perfect for viewing bright star clusters. Spring brings galaxy-hunting season in the Virgo cluster. Summer reveals the Milky Way's core in all its glory, though shorter nights mean later viewing times.
Don't forget to check your local weather patterns. Spring often brings more cloudy nights, while fall typically offers stable viewing conditions. You can maximize your stargazing success by creating a monthly calendar that tracks moon phases, meteor showers, and seasonal constellation changes. Apps and planetarium software can help you predict when specific objects will be visible from your location.
Frequently Asked Questions
How Do I Explain Basic Astronomy Concepts to Children Joining My Stargazing Sessions?
Start with familiar objects like the Moon and planets. Use simple comparisons they'll understand – Earth's like a giant marble, stars are distant suns. Let them ask questions and discover space's wonders naturally.
Can Light Pollution Filters for Cameras Improve Naked-Eye Viewing of Stars?
No, camera filters won't help your naked eyes see stars better. They're designed specifically for camera sensors, not human vision. You'll need different solutions like finding darker locations to improve your stargazing experience.
What Emergency Supplies Should I Keep in My Astronomy Haven?
You'll need a first-aid kit, flashlights with red filters, extra batteries, warm blankets, water bottles, snacks, a charged phone, and emergency contact numbers when stargazing. Don't forget weather-appropriate clothing and insect repellent.
How Do Smartphone Astronomy Apps Affect Night Vision Adaptation?
You'll lose your night vision when using astronomy apps, even with red screen filters. Keep your phone's brightness at minimum and limit viewing to brief checks to maintain your eyes' dark adaptation.
Should I Join Local Astronomy Clubs Before Creating My Backyard Setup?
You'll benefit from joining astronomy clubs first – they'll share setup advice, let you test different equipment, and connect you with experienced stargazers. Plus, you'll avoid costly mistakes in building your own observatory.
In Summary
By transforming your backyard into a personal astronomy sanctuary, you're opening the door to countless nights of celestial wonder. Whether you're tracking constellations, photographing meteor showers, or simply meditating under the stars, you'll find that your custom space enhances every viewing experience. Don't wait to start your stargazing journey – your perfect astronomical retreat is just a few thoughtful additions away.
Leave a Reply