Transform your backyard into a peaceful haven with these DIY retreat ideas. Create a zen garden reading nook with water-resistant loungers and Japanese forest grass, or hang a sturdy hammock for your personal tea corner. Build a meditation platform with privacy screens, or design a natural stone path that winds through fragrant herbs. You can craft a cozy blanket fort, install a bamboo wind chime sanctuary, or construct a plant-covered pergola for shade. Add a secret garden nook, candlelit evening space, or rain chain water feature for extra tranquility. Let's explore how to bring these serene sanctuaries to life.
Zen Garden Reading Nook

Tranquility awaits in your own backyard Zen garden reading nook. Create this peaceful retreat by first selecting a quiet corner that receives dappled sunlight and offers natural privacy from neighboring views.
Install a comfortable weatherproof lounger or bench, complemented by soft, water-resistant cushions in muted earth tones. Frame your reading space with low-maintenance plants like Japanese forest grass, dwarf bamboo, and moss.
Add carefully placed rocks and pebbles in varying sizes to represent water and mountains – key elements in traditional Zen gardens. You'll want to incorporate a small gravel bed that you can rake into soothing patterns, creating a meditative ritual before settling in with your book.
Consider adding a small water feature, such as a bamboo fountain, to mask ambient noise. Install solar-powered lanterns or string lights for evening reading sessions.
Don't forget practical touches like a small side table for your beverages and a weatherproof storage box for your reading materials. Complete the space with potted bonsai trees or Japanese maples to provide seasonal interest and reinforce the contemplative atmosphere.
Meditation Platform With Privacy Screen
Creating your own meditation platform with a privacy screen gives you a peaceful spot to practice mindfulness while remaining sheltered from wind and prying eyes.
You'll need pressure-treated lumber, exterior-grade screws, weather-resistant fabric or bamboo panels, and post anchors to secure your structure to the ground.
With basic carpentry tools and a weekend's worth of time, you can build a simple 6×8 foot platform elevated 8 inches off the ground, complete with an adjustable privacy screen that lets you control sunlight and exposure.
Materials and Design Elements
When planning your meditation platform, selecting the right materials and design elements sets the foundation for a lasting outdoor sanctuary.
Choose weather-resistant lumber like cedar, redwood, or pressure-treated pine for the platform's base and frame. These woods naturally resist decay and insects while providing stability and durability.
For the platform's surface, consider composite decking materials that won't splinter or require frequent maintenance. You'll want to add non-slip strips or textured surfaces for safety during wet conditions.
The privacy screen can incorporate bamboo panels, cedar lattice, or weather-resistant fabric panels that you can easily remove during storms.
Add functional design elements like built-in storage benches for meditation cushions and blankets. Install adjustable screen panels that you can pivot to block sun or wind from different angles.
Consider incorporating plant holders into your screen design for climbing vines or hanging plants that enhance privacy naturally.
For lighting, integrate solar-powered LED strips under handrails or small lanterns mounted on posts.
You'll also want to guarantee proper drainage by slightly angling the platform and leaving small gaps between decking boards. Include stable steps or a ramp for safe access to your meditation space.
Building Step-by-Step Instructions
Building your meditation platform takes six main phases: foundation preparation, frame construction, decking installation, privacy screen assembly, finishing touches, and weatherproofing.
Begin by clearing and leveling your chosen area, then install concrete pier blocks at each corner and center points to create a stable foundation.
Construct the frame using pressure-treated 2×6 lumber, creating a square or rectangular structure with joists spaced 16 inches apart. Secure all connections with galvanized deck screws and joist hangers.
Install composite or cedar decking boards perpendicular to the joists, leaving 1/8-inch gaps between boards for drainage.
For the privacy screen, mount 4×4 posts into post anchors attached to the frame. Connect horizontal supports between posts using 2x4s.
Weave weather-resistant bamboo or cedar slats through the supports, spacing them according to your desired privacy level.
Add finishing touches like corner caps and decorative post tops. Apply two coats of exterior-grade sealant to all wooden surfaces.
Don't forget to incorporate anti-slip strips on the decking and guarantee all hardware is rust-resistant.
Test the platform's stability before adding cushions, plants, or other meditation accessories.
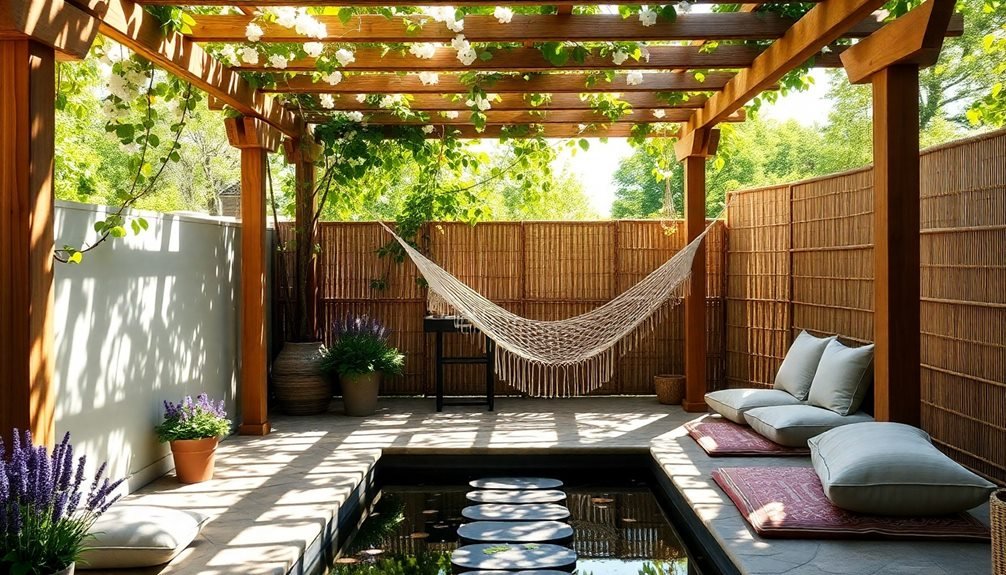
Hanging Hammock Tea Corner

A secluded hammock tea corner transforms any outdoor nook into your personal relaxation zone. You'll need to select a sturdy hammock rated for outdoor use and identify two anchor points that can support at least 400 pounds of weight. Install mounting hardware at least 8 feet apart, ensuring they're securely fastened into solid structures like posts or mature trees.
| Essential Items | Purpose |
|---|---|
| Weather-resistant hammock | Primary seating |
| Folding side table | Tea service station |
| Outdoor cushions | Added comfort |
| LED string lights | Evening ambiance |
| Storage ottoman | Supply storage |
Position your folding side table within arm's reach of the hammock for easy access to tea essentials. Add a weather-resistant storage ottoman nearby to keep blankets, books, and tea supplies protected. You'll want to incorporate outdoor cushions in water-resistant fabrics to enhance comfort and match your garden's aesthetic. String LED lights overhead for evening relaxation, and consider adding a small wind chime for gentle ambient sound. Remember to treat your hammock with UV protectant spray every season and bring cushions indoors during inclement weather to extend their life.
Natural Stone Relaxation Path
Creating a natural stone relaxation path begins with planning a gently winding route that guides you through your garden's most peaceful spots.
You'll need to select stones that complement your landscape while providing stable footing – flat flagstones or river rocks work well for different design styles.
Once you've chosen your materials, proper installation requires a level base of compacted gravel and sand to guarantee your path remains stable through changing seasons.
Pathway Design Fundamentals
Well-designed pathways serve as the backbone of any outdoor sanctuary, guiding both movement and mindfulness throughout your space.
When planning your path's layout, you'll want to focus on both functionality and flow, creating curves that feel natural rather than forced. Start by marking your intended route with rope or garden hoses to visualize the final design before making permanent changes.
Consider your path's width carefully – main walkways should be at least 4 feet wide to allow comfortable side-by-side walking, while secondary paths can be 2-3 feet wide.
You'll need to maintain proper drainage by creating a slight crown or slope, ensuring water runs off rather than pools on the surface. The path's foundation matters greatly; lay a 4-inch base of crushed stone or gravel before adding your chosen surface material.
For visual interest, vary your path's rhythm by incorporating wider sections for meditation spots or natural pausing points.
You'll want to integrate lighting along the edges for safety and ambiance during evening hours.
Remember to account for existing landscape features and plan around mature trees, ensuring your path complements rather than compromises your garden's natural elements.
Stone Selection and Installation
Selecting the right stones forms the foundation of a successful relaxation path. You'll want to choose flat, stable stones that are at least 2 inches thick and wide enough to accommodate a comfortable stride—typically 18-24 inches across. Focus on stones with non-slip surfaces, such as bluestone, granite, or textured limestone, to guarantee safety in wet conditions.
Before installation, prepare the ground by removing grass and topsoil to a depth of 4-6 inches. Add a layer of landscape fabric to prevent weed growth, followed by 2 inches of compacted gravel for drainage. Set each stone by nestling it into a 1-inch bed of sand, using a rubber mallet to ascertain it's level and stable.
Space your stones 24-30 inches apart from center to center, allowing for a natural walking rhythm. You'll need to check that each stone is level both horizontally and with adjacent stones. Fill gaps between stones with pea gravel or ground cover plants like creeping thyme.
For stability, edge the path with metal or plastic landscape edging, buried 2 inches below grade to maintain a clean, professional appearance.
Secret Garden Mindfulness Space

Every mindfulness journey deserves a private outdoor sanctuary, and a secret garden nook can transform an unused corner into your personal meditation retreat.
Start by selecting a secluded spot shielded by existing structures or vegetation, then enhance privacy with climbing vines, bamboo screens, or lattice panels.
Create a comfortable seating area using weather-resistant cushions or a meditation bench, positioning them on a stable surface like flagstone or decking.
You'll want to incorporate elements that engage your senses: wind chimes for gentle sound, aromatic herbs for scent, and soft-textured plants for visual interest. Consider adding lavender, sage, or lemon balm, which offer both fragrance and calming properties.
Install subtle lighting with solar-powered lanterns or string lights to extend your meditation practice into evening hours.
A small water feature, like a tabletop fountain, can provide white noise to mask neighborhood sounds.
Don't forget to include practical touches: a small shelf for tea supplies, meditation tools, or journals, and perhaps a weather-resistant storage box for cushions.
Keep the space clutter-free and minimal, allowing your mind to settle into stillness without visual distractions.
Rain Chain Water Feature
Adding to your mindfulness garden's serenity, a rain chain water feature combines visual appeal with the soothing sounds of flowing water. Unlike traditional downspouts, rain chains guide water in a visually striking way, creating a gentle cascade that transforms rainfall into an artful display.
You'll find that these chains work effectively during both rain showers and as a standalone water feature connected to a recirculating pump.
To create your rain chain feature, select copper or brass chains for durability and natural patina development. Install a gutter diverter at your roof's edge, then secure the chain's mounting bracket.
You can enhance the display by adding a collection basin below – consider a decorative pot filled with river rocks or a small ground-level pond. For year-round enjoyment, connect a small pump that recirculates water from the basin up through a concealed tube along the chain.
Position your rain chain where you'll see and hear it from your favorite garden spot. For maximum impact, place copper cups, bells, or decorative links along the chain to create varied water patterns and sounds that'll enhance your outdoor meditation space.
Cozy Outdoor Blanket Fort

Transform your garden's quiet corner into a whimsical retreat with a cozy outdoor blanket fort. Start by selecting four sturdy garden poles or bamboo stakes, positioning them in a square formation about six feet apart. Secure each pole firmly into the ground, ensuring they're at least seven feet tall for adequate headroom.
Choose weather-resistant sheets or outdoor fabric in light, breezy colors. You'll want to treat the fabric with waterproofing spray to protect against moisture. String fairy lights along the top edges before draping your fabric, creating a magical ambiance for evening relaxation. Secure the fabric using sturdy clips or rope, leaving one side as an entrance.
Layer the ground with outdoor rugs and waterproof cushions, adding throw pillows in washable covers. Include storage boxes for blankets and reading materials, keeping them protected from morning dew.
Install small solar-powered lanterns at each corner for additional lighting. You can also add potted plants around the perimeter to enhance privacy and create a natural border.
When storms approach, you'll need just five minutes to dismantle your fort and store the materials in a weather-tight container.
Plant-Covered Reading Pergola
Creating your perfect plant-covered reading pergola starts with gathering the right materials: pressure-treated lumber, concrete footings, galvanized hardware, and weather-resistant fabric for optional shade panels.
You'll need to select ideal climbing plants like wisteria, clematis, or jasmine that match your climate zone and desired growth rate for achieving the lush, natural canopy effect.
The installation process combines basic carpentry skills with proper plant placement, ensuring your structure's stability while providing strategic support for your chosen vines to flourish.
Essential Building Materials Required
The construction of a plant-covered reading pergola typically requires several fundamental materials to secure its stability and aesthetic appeal. You'll need to gather both structural components and decorative elements before beginning your project.
| Material Type | Specifications |
|---|---|
| Posts | 6×6 pressure-treated lumber (4 pieces, 10' each) |
| Beams | 2×8 cedar boards (4 pieces, 12' each) |
| Rafters | 2×6 cedar boards (8 pieces, 8' each) |
| Hardware | Galvanized post anchors, lag bolts, deck screws |
| Plants | Climbing vines, flowering species |
For the foundation, you'll want concrete mix for the post holes and gravel for drainage. Don't forget to include weatherproof cushions and seating elements for comfort. You'll also need climbing support materials like galvanized wire mesh or wooden lattice panels to guide your plants' growth.
The tools required include a post-hole digger, level, drill, saw, and measuring tape. Consider adding solar-powered lights or weatherproof electrical fixtures for evening reading sessions. Remember to choose materials rated for outdoor use to ensure your pergola withstands various weather conditions.
Climbing Plant Selection Guide
Once you've gathered your structural materials, selecting the right climbing plants will determine your pergola's final appearance and maintenance needs.
Choose between annual vines for rapid seasonal coverage or perennial climbers for long-term growth. Fast-growing options like morning glory and moonflower provide quick coverage but require yearly replanting, while established wisteria and climbing roses offer permanent solutions.
Consider your climate zone when selecting plants. Clematis thrives in zones 4-9 and offers stunning blooms, while jasmine suits warmer regions in zones 7-10.
You'll need to match your plant's climbing mechanism to your structure – twiners like honeysuckle wrap around supports naturally, while others like ivy require lattice or wire mesh.
Don't overlook maintenance requirements. Some vigorous growers like wisteria need regular pruning to prevent structural damage, while less aggressive climbers like climbing hydrangea are more manageable.
Factor in sunlight exposure – east or south-facing pergolas accommodate sun-loving plants like bougainvillea, while shade-tolerant varieties like climbing hydrangea work well in darker spots.
For year-round interest, mix evergreen climbers with deciduous varieties that provide seasonal color changes.
Installation Step-by-Step Process
Building your dream reading pergola requires careful planning and precise execution. Start by marking your chosen location with stakes and string, guaranteeing the ground is level. Dig holes 2 feet deep for each post, adding gravel for drainage and concrete for stability.
Once your posts are set and level, attach horizontal beams across the top using galvanized lag screws. Install cross beams perpendicular to the main beams, spacing them 12 inches apart to support climbing plants. Add diagonal braces at each corner to prevent swaying.
Install lattice panels or wire mesh on the sides where you'll train your climbers. You'll need to secure these firmly to both vertical posts and horizontal supports.
Create a comfortable seating area by building a weatherproof bench or placing weather-resistant furniture beneath the structure.
Add planter boxes at the base of each post, filling them with quality potting soil and your chosen climbing plants. Install drip irrigation lines along the posts and beams to guarantee consistent watering.
Bamboo Wind Chime Sanctuary

Creating a bamboo wind chime sanctuary transforms an ordinary backyard corner into a meditative space filled with soothing natural sounds. You'll need several bamboo poles of varying lengths, strong nylon cord, and a dedicated corner with overhead support, such as a sturdy tree branch or pergola beam.
Start by selecting bamboo pieces that are 1-2 inches in diameter and cutting them into different lengths between 12-24 inches. Sand the edges smooth and drill small holes near the top of each piece. Thread the nylon cord through these holes, spacing the bamboo poles about 3 inches apart. You'll want to create multiple strands, each with 5-7 pieces of bamboo.
Arrange your wind chimes in a circular or spiral pattern, hanging them at slightly different heights. For the best sound, position the sanctuary where it'll catch gentle breezes.
Add solar-powered lanterns around the base and incorporate potted bamboo plants to enhance the zen atmosphere. You can also integrate small crystals or glass beads between the bamboo pieces to create subtle light reflections and additional gentle sounds when they touch.
Candlelit Evening Retreat Area
While daytime sanctuaries offer natural light and breezes, a candlelit evening retreat brings a different kind of magic to your outdoor space. Transform a corner of your patio or garden into an enchanting nighttime haven using strategically placed flameless LED candles and traditional wax options in weather-resistant holders.
Start by defining your retreat area with outdoor curtains or portable screens, creating an intimate setting that blocks unwanted light from neighboring properties. Layer various candle heights using stone pedestals, hanging lanterns, and mason jar luminaries to add depth and dimension.
You'll want to incorporate copper or brass candleholders that reflect warm light and create subtle sparkle. Don't forget safety – embed solar-powered ground lights along pathways leading to your retreat, and use hurricane glasses to protect candle flames from wind.
Add comfort with weather-resistant cushions and throws in deep, rich colors that complement the candlelight's warm glow. Consider installing a small water feature nearby – the sound of trickling water paired with flickering flames creates an incredibly soothing atmosphere.
For year-round use, install an adjustable pergola cover to protect your evening sanctuary from unexpected weather.
Frequently Asked Questions
How Do You Maintain DIY Outdoor Spaces During Harsh Winter Conditions?
You'll need to cover furniture, remove cushions, and clear snow regularly. Don't forget to seal wooden surfaces, drain water features, and wrap delicate plants. Store decorative items indoors to prevent weather damage.
What Permits Are Required for Building Permanent Outdoor Retreat Structures?
You'll need building permits, zoning approvals, and HOA clearance before constructing permanent structures. Contact your local planning office to verify specific requirements, as they vary by location and project scope.
How Can You Pest-Proof Meditation Areas Without Using Harmful Chemicals?
You'll protect your meditation area from pests naturally by planting lavender, rosemary, and citronella grass nearby. Add cedar mulch, keep spaces clean, and use fine mesh screens on any structures or seating areas.
What's the Average Cost Range for Creating a Complete Outdoor Sanctuary?
You'll spend between $1,500 to $5,000 for a basic outdoor sanctuary, including seating, plants, and lighting. If you're adding water features, pergolas, or extensive landscaping, costs can reach $10,000 or more.
How Do You Soundproof Outdoor Meditation Spaces From Noisy Urban Environments?
You'll reduce urban noise by installing tall privacy fencing, adding dense hedges, using outdoor sound panels, and incorporating water features. White noise machines and wind chimes can help mask unwanted sounds in your meditation space.
In Summary
You'll find endless possibilities to create your perfect outdoor sanctuary with these DIY retreats. Whether you're seeking a quiet reading nook or a meditative space, these projects will help you carve out a peaceful haven in your own backyard. Remember, it's not about perfection – it's about crafting a space that speaks to your soul and provides the tranquility you need to recharge and reconnect with nature.


Leave a Reply