Transform your living space into a serene sanctuary with these seven DIY home accents. You'll find tranquility in handcrafted macramé wall hangings that add soft texture and boho charm. Create personal pressed flower art frames to bring nature's beauty indoors, or install natural driftwood shelving for organic appeal. Set the mood with homemade aromatherapy candles and essential oil diffusers featuring your favorite calming scents. Add the soothing sounds of indoor zen water features, from bamboo fountains to stone basins. Finally, craft woven basket planters to house your favorite greenery. These peaceful touches will help you master the art of mindful home design.
Macramé Wall Hangings

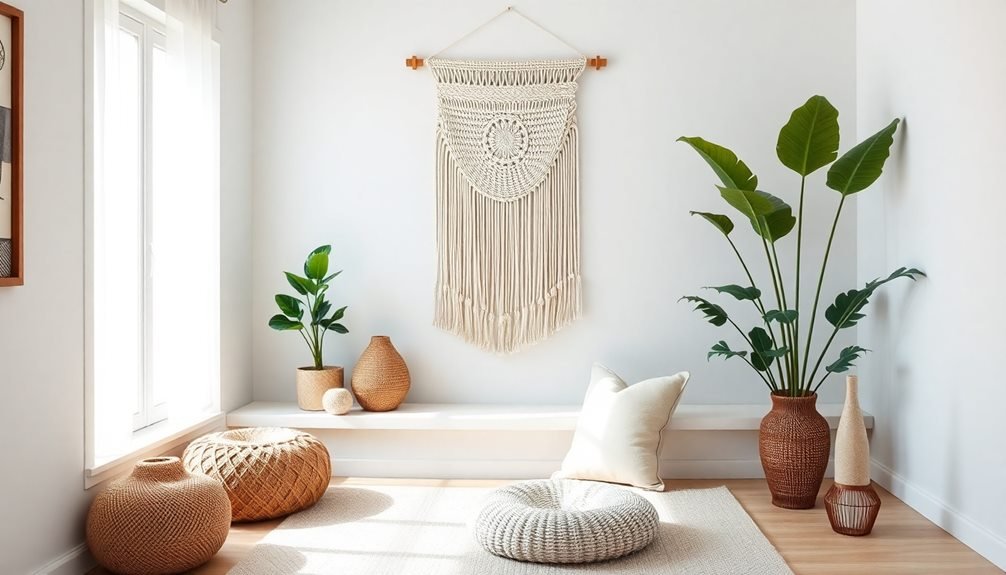
Macramé wall hangings add a bohemian touch to any room while letting you explore the art of decorative knotting. You'll need cotton cord, a wooden dowel, and basic knot-tying skills to create your own unique piece. Start by mastering the square knot and half-hitch knot, which form the foundation of most macramé patterns.
To begin, cut your cords to equal lengths, allowing extra length for knotting and fringe. Attach the cords to your dowel using larks head knots, then work your way down, creating patterns through alternating knots. You can incorporate wooden beads, copper rings, or dyed cord sections for added visual interest.
Common macramé patterns include diamond shapes, diagonal lines, and chevron designs. You'll want to maintain consistent tension throughout your work to guarantee professional-looking results. As you progress, try combining different knot types to create texture and depth.
Don't forget to measure your wall space beforehand – most hangings look best when they're sized proportionally to your wall area. Once you've finished knotting, trim the bottom fringe evenly and gently brush it out for that characteristic soft, feathered look.
Pressed Flower Art Frames
Throughout the year, pressed flower art frames offer a charming way to preserve nature's beauty and create personalized wall decor. You'll find this craft both meditative and rewarding as you transform delicate blooms into lasting artwork. With just a few supplies like heavy books, parchment paper, and floating frames, you can start preserving flowers from your garden or special occasions.
- Choose flowers that press well, such as pansies, daisies, and small wildflowers – avoid thick or succulent varieties that contain too much moisture and may develop mold.
- Layer your flowers between parchment paper sheets, ensuring petals are arranged as desired, then place them inside a heavy book with additional weight on top for 2-3 weeks.
- Once completely dried, carefully arrange your pressed flowers on acid-free paper within a floating frame, securing them with tiny dots of archival glue.
To create depth in your composition, combine different flower types and sizes, and don't forget to include delicate leaves and ferns.
You'll want to handle the dried specimens with tweezers to prevent damage from skin oils. Display your frames away from direct sunlight to maintain the flowers' natural colors longer.
Natural Driftwood Shelving

Bringing the outdoors in doesn't stop with pressed flowers – natural driftwood can transform your walls into stunning functional art.
You'll find that driftwood shelving adds an organic, beachy vibe while providing practical storage space for your favorite items.
To create your own driftwood shelves, you'll need to source pieces that are thoroughly dried and cleaned. Look for sturdy pieces at least 2 inches thick with relatively flat surfaces.
Clean each piece with a wire brush, then sanitize with a mixture of bleach and water. After drying completely, seal the wood with a clear matte finish to prevent deterioration.
Mount your driftwood shelves using heavy-duty brackets or invisible floating shelf hardware. You'll want to locate wall studs and use appropriate anchors to guarantee stability.
Position larger pieces as statement shelves for books or pottery, and arrange smaller pieces as artistic ledges for air plants and small decor items.
For added interest, combine different sizes and shapes of driftwood, maintaining a balanced composition.
Consider incorporating LED strip lighting underneath to create dramatic shadows and highlight displayed objects.
Don't overcrowd your shelves – let each piece's natural beauty shine through.
Aromatherapy Candle Making
Your first venture into aromatherapy candle making starts with selecting essential oil combinations that'll create your desired therapeutic effect – lavender for relaxation, citrus for energy, or eucalyptus for focus.
You'll need to measure your oils carefully, typically using 1 ounce of essential oil per pound of wax to achieve the right scent strength.
The wax-pouring process requires patience and precision: heat your wax to the correct temperature, add your oils at just the right moment, and pour steadily to prevent air bubbles from forming.
Essential Oil Blend Basics
Creating custom aromatherapy candles starts with mastering essential oil combinations that complement each other.
You'll need to understand the three main categories of essential oil notes: top, middle, and base. Top notes like lemon, peppermint, and eucalyptus evaporate quickly but provide immediate impact. Middle notes such as lavender, rosemary, and chamomile form the heart of your blend and last several hours. Base notes including vanilla, sandalwood, and cedarwood anchor the fragrance and can last for days.
When blending oils for your candles, follow these essential guidelines:
- Start with a 30-30-40 ratio (top-middle-base) for a well-balanced fragrance that evolves naturally as it burns.
- Test your combinations on scent strips before adding them to your wax, using no more than 3-4 oils per blend.
- Calculate the total amount of essential oils at 6% of your wax weight for ideal scent throw.
Remember to document successful combinations in your crafting journal.
You'll find that certain pairings like lavender-vanilla, peppermint-eucalyptus, and orange-cedarwood consistently produce pleasing results in your handcrafted candles.
Wax Pouring Made Simple
Pouring wax into your prepared containers ranks among the most critical steps in candle making.
You'll need to monitor your wax temperature carefully, typically aiming for 185°F for soy wax and 175°F for beeswax. Use a reliable thermometer and heat your wax in a double boiler setup to prevent scorching.
Once your wax reaches the proper temperature, add your chosen essential oils. You'll want roughly 1 ounce of fragrance per pound of wax. Stir gently for 30 seconds to incorporate the oils without creating air bubbles.
Before pouring, verify your containers are at room temperature and your wicks are centered and secured.
Pour the wax slowly and steadily, leaving about ¼ inch of space at the top. Don't be alarmed if you notice a small sink hole forming around the wick as the wax cools – this is normal. You can fix it with a second pour if needed.
Let your candles cool completely at room temperature, avoiding drafts or extreme temperatures. After 24 hours, trim your wicks to ¼ inch, and you're ready to enjoy your handcrafted aromatherapy candles.
Indoor Zen Water Features

Creating your own indoor Zen water feature lets you bring tranquil sounds and soothing visuals into any room of your home.
You'll find endless possibilities with compact bamboo fountain designs that fit perfectly on desks or side tables, while easy-to-maintain tabletop water gardens add natural greenery to your peaceful display.
When selecting materials, opt for a natural stone basin that complements your décor while providing durability and authenticity to your water feature.
Compact Bamboo Fountain Designs
Three essential elements combine to make compact bamboo fountains perfect for any indoor zen space: the soothing sound of trickling water, sustainable bamboo material, and space-saving design.
You'll find that these miniature water features can transform any corner of your home into a tranquil retreat while maintaining a minimal footprint.
To create your own bamboo fountain, you'll need specific materials and tools that guarantee both functionality and aesthetic appeal:
- Core components: 3-4 bamboo poles (varying diameters), a small submersible pump (40-80 GPH), and a shallow ceramic basin that complements your décor
- Essential tools: Waterproof sealant, aquarium-grade silicone, bamboo drill bits, and copper or PVC connecting pipes
- Decorative elements: River rocks, preserved moss, and LED underwater lights for ambient lighting
When designing your fountain, focus on creating a gentle water flow that produces a soft, melodic sound.
Position the bamboo pieces at slight angles to achieve the perfect cascade effect. You'll want to seal all bamboo sections thoroughly to prevent water damage and guarantee your fountain's longevity.
Remember to maintain a water level that keeps your pump fully submerged.
Easy Tabletop Water Gardens
While bamboo fountains bring vertical interest to your space, tabletop water gardens offer a broader, horizontal approach to indoor water features.
These miniature aquatic landscapes combine water, plants, and decorative elements in shallow containers to create serene focal points for any room.
You'll need a watertight container at least 6 inches deep, aquatic plants, and small decorative stones.
Start by selecting moisture-loving plants like peace lilies, lucky bamboo, or true aquatic specimens such as dwarf water lilies.
Position taller plants toward the back and shorter ones in front, using small clay pots filled with aquatic planting media.
Add polished river rocks or glass beads to cover the pots' bases and create visual interest.
Fill the container with dechlorinated water until it reaches just below the plants' crown.
You can incorporate small fountains or bubblers for gentle water movement, which helps prevent mosquitoes and stagnation.
Maintain your water garden by checking water levels weekly, trimming dead leaves, and changing 25% of the water monthly.
Place it where it'll receive indirect sunlight and away from heating vents to minimize evaporation and algae growth.
Natural Stone Basin Tips
Natural stone basins serve as striking centerpieces for indoor Zen-inspired water features. When selecting your perfect stone basin, you'll want to evaluate both aesthetics and functionality. The basin's depth should accommodate your chosen pump while maintaining proper water levels for smooth operation. Choose weathered granite, polished marble, or natural slate – each material brings its unique character to your space.
- Seal your stone basin properly before use to prevent water absorption and mineral buildup. Apply a high-quality stone sealer every 6-12 months to maintain its integrity and appearance.
- Install rubber feet or padding beneath your basin to protect surfaces and reduce vibration noise from the pump. You'll also want to ascertain the basin sits completely level to prevent uneven water flow.
- Size your pump according to your basin's dimensions – a general rule is one gallon per hour of flow rate for every inch of basin width. This guarantees proper water circulation without overwhelming the vessel.
Position your stone basin away from direct sunlight to minimize algae growth and evaporation.
You'll find that proper placement and maintenance will keep your water feature running smoothly while creating a tranquil atmosphere in your home.
Woven Basket Planters
Transforming ordinary baskets into stylish planters lets you add texture and warmth to any room's décor. You'll need to waterproof your basket first by applying several coats of clear polyurethane or inserting a plastic liner. Choose baskets with tight weaves and sturdy construction to guarantee longevity.
| Plant Type | Basket Size | Best Location |
|---|---|---|
| Succulents | Small/Shallow | Windowsills |
| Trailing Vines | Medium/Deep | Hanging/Corners |
| Large Ferns | Large/Wide | Floor-Standing |
Select baskets with handles if you're planning to hang them, and confirm they're reinforced to support the weight of soil and plants. For proper drainage, drill small holes through both the basket and liner, or add a layer of pebbles at the bottom. You'll want to place a drip tray underneath to protect your surfaces.
Maintain your basket planters by regularly checking for moisture damage and reapplying waterproofing as needed. Don't overwater, as excess moisture can weaken the basket's fibers over time. If you're placing them outdoors, bring them inside during wet weather to extend their lifespan.
Handcrafted Essential Oil Diffusers

Creating your own essential oil diffusers combines style with aromatherapy benefits, making them perfect for personalized home fragrance.
You'll find that handcrafting diffusers not only saves money but also lets you control the materials and design elements that match your décor. From reed diffusers to ceramic vessels, you can craft beautiful pieces that'll enhance any room's ambiance.
1. Transform clear glass bottles into elegant reed diffusers by adding a blend of mineral oil and essential oils, then inserting natural rattan reeds.
Customize the bottle with paint, twine, or pressed flowers for a unique touch.
2. Create a clay pendant diffuser by rolling out air-dry clay, cutting your desired shape, and adding texture with stamps or lace.
Once dry, thread a string through the top and add 2-3 drops of oil.
3. Design a stone diffuser by selecting smooth river rocks, drilling small indentations on top, and sealing the surface with beeswax.
These natural diffusers work perfectly on desks or nightstands.
When crafting your diffuser, you'll want to ponder the room's size and desired scent intensity.
Choose oils that complement your space's purpose, like lavender for bedrooms or citrus for living areas.
Frequently Asked Questions
How Long Does It Take to Master Basic DIY Home Accent Techniques?
You'll need about 2-3 months to master basic DIY home accent techniques. With regular practice and simple projects like painting, stenciling, and basic woodworking, you can develop solid skills within this timeframe.
What Tools Should Beginners Invest in for Creating Multiple Home Accents?
You'll need basic tools like a drill, hammer, level, measuring tape, paint brushes, sandpaper, screwdrivers, and a utility knife. Don't forget safety gear – protective glasses and work gloves are essential.
Can DIY Home Accents Affect Property Value When Selling?
You'll boost your property value with well-executed DIY accents that enhance curb appeal and interior aesthetics. Quality built-ins, crown molding, and custom storage solutions can make your home more attractive to buyers.
Which Home Accents Are Child and Pet-Friendly?
You'll want to choose soft cushions, rounded-edge furniture, washable fabrics, and secured wall hangings. Opt for non-toxic materials, avoid small decorative pieces, and use durable rugs that can handle active pets and kids.
How Often Should DIY Home Accents Be Cleaned or Maintained?
You'll want to dust DIY accents weekly and deep clean them monthly. For fabric items, wash every 3-6 months. Check wooden pieces yearly for repairs, and refresh paint or finishes as needed.
In Summary
You'll find that creating these seven DIY home accents brings both beauty and tranquility to your living spaces. Whether you're weaving a macramé wall hanging or crafting your own essential oil diffuser, each project lets you infuse your home with personal touches that promote peace. Start with one project that speaks to you, and you'll soon discover how handmade elements transform your space into a serene sanctuary.

Leave a Reply